Need to get financed? Apply for a Synchrony Account to make all of your wishes come true! Find out more and apply
Need to get financed? Apply for a Synchrony Account to make all of your wishes come true! Find out more and apply
If you are looking for an easy project using some of that really fun and colorful pet screen you see everywhere, this is it!Â
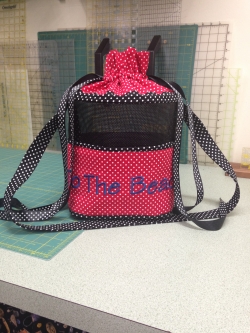
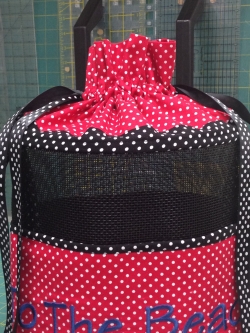
This is another fun pattern by Michelle Dorsey from SewMichelle.com that is quite nice and appropriate for a day at the beach! All of Michelle’s patterns are well thought out and contain great pictures and instructions. If you are looking for an easy project using some of that really fun and colorful pet screen you see everywhere, this is it! This screen bag is somewhat different from others we have made because it has a drawstring top. And, the pattern leaves a nice area of screen showing in the center of the bag to add some embroidery if you wish. Embroidering on screen is a lot of fun and not difficult at all if you have never tried it! The size of this tote is approximately 9” wide, 16” tall and 6” deep. We will have this pattern here in the store for you to purchase for $12.95. Below, you will see a list of materials and the cutting that is required for class. If you complete the cutting prep before class, you will easily complete the tote! This will be a one day class so the cost is $10. Get out your swimsuit, a nice cold beverage and fire up that sewing machine! Come on down and join us for class!
Supplies:
The Draw Screen Tote pattern
--Good Sewing Mahcine in Good Working Order--
½ yard of pet screen – we have pre-cut pieces of screen in many
colors here at Schiller’s for only $4.99 that are the perfect size
for this project!
¾ yard of fabric for fabric A (the red polka dots on my sample)
¾ yard of fabric for fabric B (the black polka dots on my sample)
¼ yard of Pellon Fusible Fleece
44” of 1” wide nylon webbing or I used a 5” WOF strip of fabric B
and fused a 5” x 42” strip of Décor Bond to the wrong side. I will
show you how to fold and stitch this strip into a nice strong handle.
72” of Parachute Cord (for drawstring) or I used matching polka dot
ribbon for my drawstrings and you could as well!
Chalk marker
Frixion marker or water soluble marker
Matching threads
Size 16 or 18 jeans needle
Edge Stitch Foot – optional but helpful
Basting spray
Regular sewing notions
Cutting Prep:
Fabric A Cut:
(2) pieces 7 ½” x 15” – exterior of upper drawstring portion
(2) strips 6” x 15” – exterior of lower fabric portion
Fabric B Cut:
(2) pieces 5 ½” x 15” – lining for upper drawstring portion
(2) pieces 2” x 15” – accent piece for upper drawstring portion
(2) strips 6” x 15” – lining for lower fabric portion
(2) strips 2 ½” x WOF – binding for lower fabric portion
Fabric C Cut:
(1) strip 2 ½” x WOF – interior binding (or a pkg of double fold
bias binding to match the color of your screen)
Fusible Fleece:
(2) strips 6” x 15” – to fuse to wrong side of exterior lower
portion fabric pieces
Pet Screen:
Cut (1) piece 15” x 26” – body of tote
PLEASE HAVE ALL SUPPLIES AND THE CUTTING PREP COMPLETED BEFORE YOU COME TO CLASS!!
Sorry, Registration is closed for this class.